
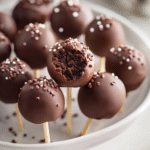
There’s something undeniably magical about chocolate cake pops. Picture this: a rich, moist chocolate cake, crumbled and mixed with velvety frosting, all elegantly coated in a shiny layer of chocolate. Each bite is a delightful explosion of sweetness and texture that dances on your taste buds. Whether you’re binge-watching your favorite series or celebrating a birthday party, these little delights make any occasion feel special.

I remember the first time I made chocolate cake pops for my niece’s birthday party. The look on her face when she saw those colorful pops was priceless. They turned out to be the star of the show! These treats bring people together, and they’re perfect for any gathering or just an indulgent solo snack. Get ready for an unforgettable flavor experience that will have you coming back for seconds!
Why You'll Love This Recipe
- These chocolate cake pops are incredibly easy to prepare, making them perfect for last-minute treats
- The rich chocolate flavor paired with creamy frosting creates an irresistible indulgence
- Their vibrant colors make them visually stunning and a hit at any celebration
- You can easily customize them with sprinkles or different coatings for added fun!
Making these chocolate cake pops was a huge hit at my friend’s wedding; everyone couldn’t get enough of them!

Essential Ingredients
Here’s what you’ll need to make this delicious dish:
-
Chocolate Cake Mix: Choose your favorite brand; I love using a rich dark chocolate mix for maximum flavor.
-
Frosting: A classic chocolate frosting works best; it adds creaminess and binds the cake together beautifully.
-
Dipping Chocolate: Use high-quality melting chocolate or candy melts; they create that irresistible outer shell.
-
Lollipop Sticks: These are essential for pop assembly; choose sturdy ones to hold those delicious bites.
-
Sprinkles (optional): Add some fun by using colorful sprinkles to decorate your cake pops!
The full ingredients list, including measurements, is provided in the recipe card directly below.
Let’s Make it Together
Prepare the Cake: Preheat your oven according to the package instructions and prepare a baking pan with nonstick spray. Bake the chocolate cake until a toothpick comes out clean, about 25-30 minutes.
Crumble the Cake: Allow the baked cake to cool completely before crumbling it into fine pieces in a large bowl. This step is crucial for achieving that perfect texture for your pops.
Add Frosting: Gradually mix in the frosting with your hands until well combined. The mixture should be moist but not overly sticky—aim for a dough-like consistency.
Shape into Balls: Take small portions of the mixture and roll them into 1-inch balls. Place these on a parchment-lined baking sheet while you prepare the next steps.
Melt Dipping Chocolate: In a microwave-safe bowl, melt your dipping chocolate according to package instructions until smooth and glossy—this is where things get exciting!
Dip and Decorate: Dip each lollipop stick into melted chocolate before inserting it into each ball to help secure it. Then coat each pop generously in more melted chocolate and add sprinkles if desired.
Now that you’ve mastered these steps, let them set in the fridge for at least 30 minutes until firm, and then enjoy every delightful bite!
You Must Know
- To master chocolate cake pops, remember that the right chocolate coating makes all the difference
- Experiment with flavors and toppings to create unique treats that wow your guests
- Perfect for parties, these pops are a fun, interactive dessert that everyone will love
Perfecting the Cooking Process
Start by baking your favorite chocolate cake, then let it cool completely before crumbling it into fine pieces. Mix in frosting for binding, shape into balls, insert sticks, and freeze before dipping in melted chocolate.

Add Your Touch
Feel free to customize with various cake flavors or frostings. You could also add sprinkles, crushed nuts, or drizzles of white chocolate for extra flair. Get creative and make each pop uniquely yours!
Storing & Reheating
Store chocolate cake pops in an airtight container at room temperature for up to three days. If you need to keep them longer, refrigerate for up to a week. Just remember to bring them back to room temperature before serving.
Chef's Helpful Tips
- Use high-quality chocolate for coating; it enhances flavor and ensures a smooth finish
- Make sure the cake is fully cooled before crumbling; this prevents melting during mixing
- When dipping, let excess chocolate drip off for a clean look and perfect finish
The first time I made these cake pops, my friends devoured them so quickly I barely had time to take pictures! Now they’re always requesting them for every gathering.

FAQ
What type of chocolate is best for coating chocolate cake pops?
Use high-quality melting chocolates or candy melts for a smooth, glossy finish.
Can I use store-bought cake mix for making chocolate cake pops?
Absolutely! Store-bought mixes save time without sacrificing taste; just follow package instructions.
How can I prevent my cake pops from falling off the sticks?
Make sure they are well-chilled before dipping and use a thick coating of chocolate for better adhesion.
Chocolate Cake Pops
Indulge in the sweet delight of chocolate cake pops, perfect for any occasion! These bite-sized treats combine rich chocolate cake and creamy frosting, all coated in luscious chocolate. Whether it’s a birthday party or a cozy night in, these pops are sure to impress. Easy to make and customizable with fun toppings, they’re a guaranteed hit that will keep everyone coming back for more!
- Prep Time: 20 minutes
- Cook Time: 30 minutes
- Total Time: 50 minutes
- Yield: Approximately 12 servings 1x
- Category: Dessert
- Method: Baking
- Cuisine: American
Ingredients
- 1 box chocolate cake mix (15.25 oz)
- 1 cup chocolate frosting
- 8 oz melting chocolate or candy melts
- 10 lollipop sticks
- colorful sprinkles (optional)
Instructions
- Preheat your oven and prepare a baking pan with nonstick spray. Bake the chocolate cake according to package instructions.
- Allow the cake to cool completely, then crumble it into fine pieces in a large bowl.
- Mix the frosting into the crumbled cake until moist but not sticky.
- Roll the mixture into 1-inch balls and place them on a parchment-lined baking sheet.
- Melt the dipping chocolate in a microwave-safe bowl until smooth.
- Dip each lollipop stick into the melted chocolate before inserting it into each ball. Coat each pop in melted chocolate and add sprinkles if desired.
- Refrigerate for at least 30 minutes until firm.
Nutrition
- Serving Size: 1 serving
- Calories: 150
- Sugar: 12g
- Sodium: 50mg
- Fat: 7g
- Saturated Fat: 4g
- Unsaturated Fat: 2g
- Trans Fat: 0g
- Carbohydrates: 19g
- Fiber: 1g
- Protein: 2g
- Cholesterol: 15mg